
Rebuilding ryantoken.com
I’ve been thinking for several months about rebuilding my website (again). There were several reasons. First, to dig back into front-end work and re-familiarize myself with that world. Next, to get up to speed with the latest JavaScript framework options and how they worked. And finally, my previous website was no longer cutting it for me in several different ways.
For reference, here’s what my website looked like before:
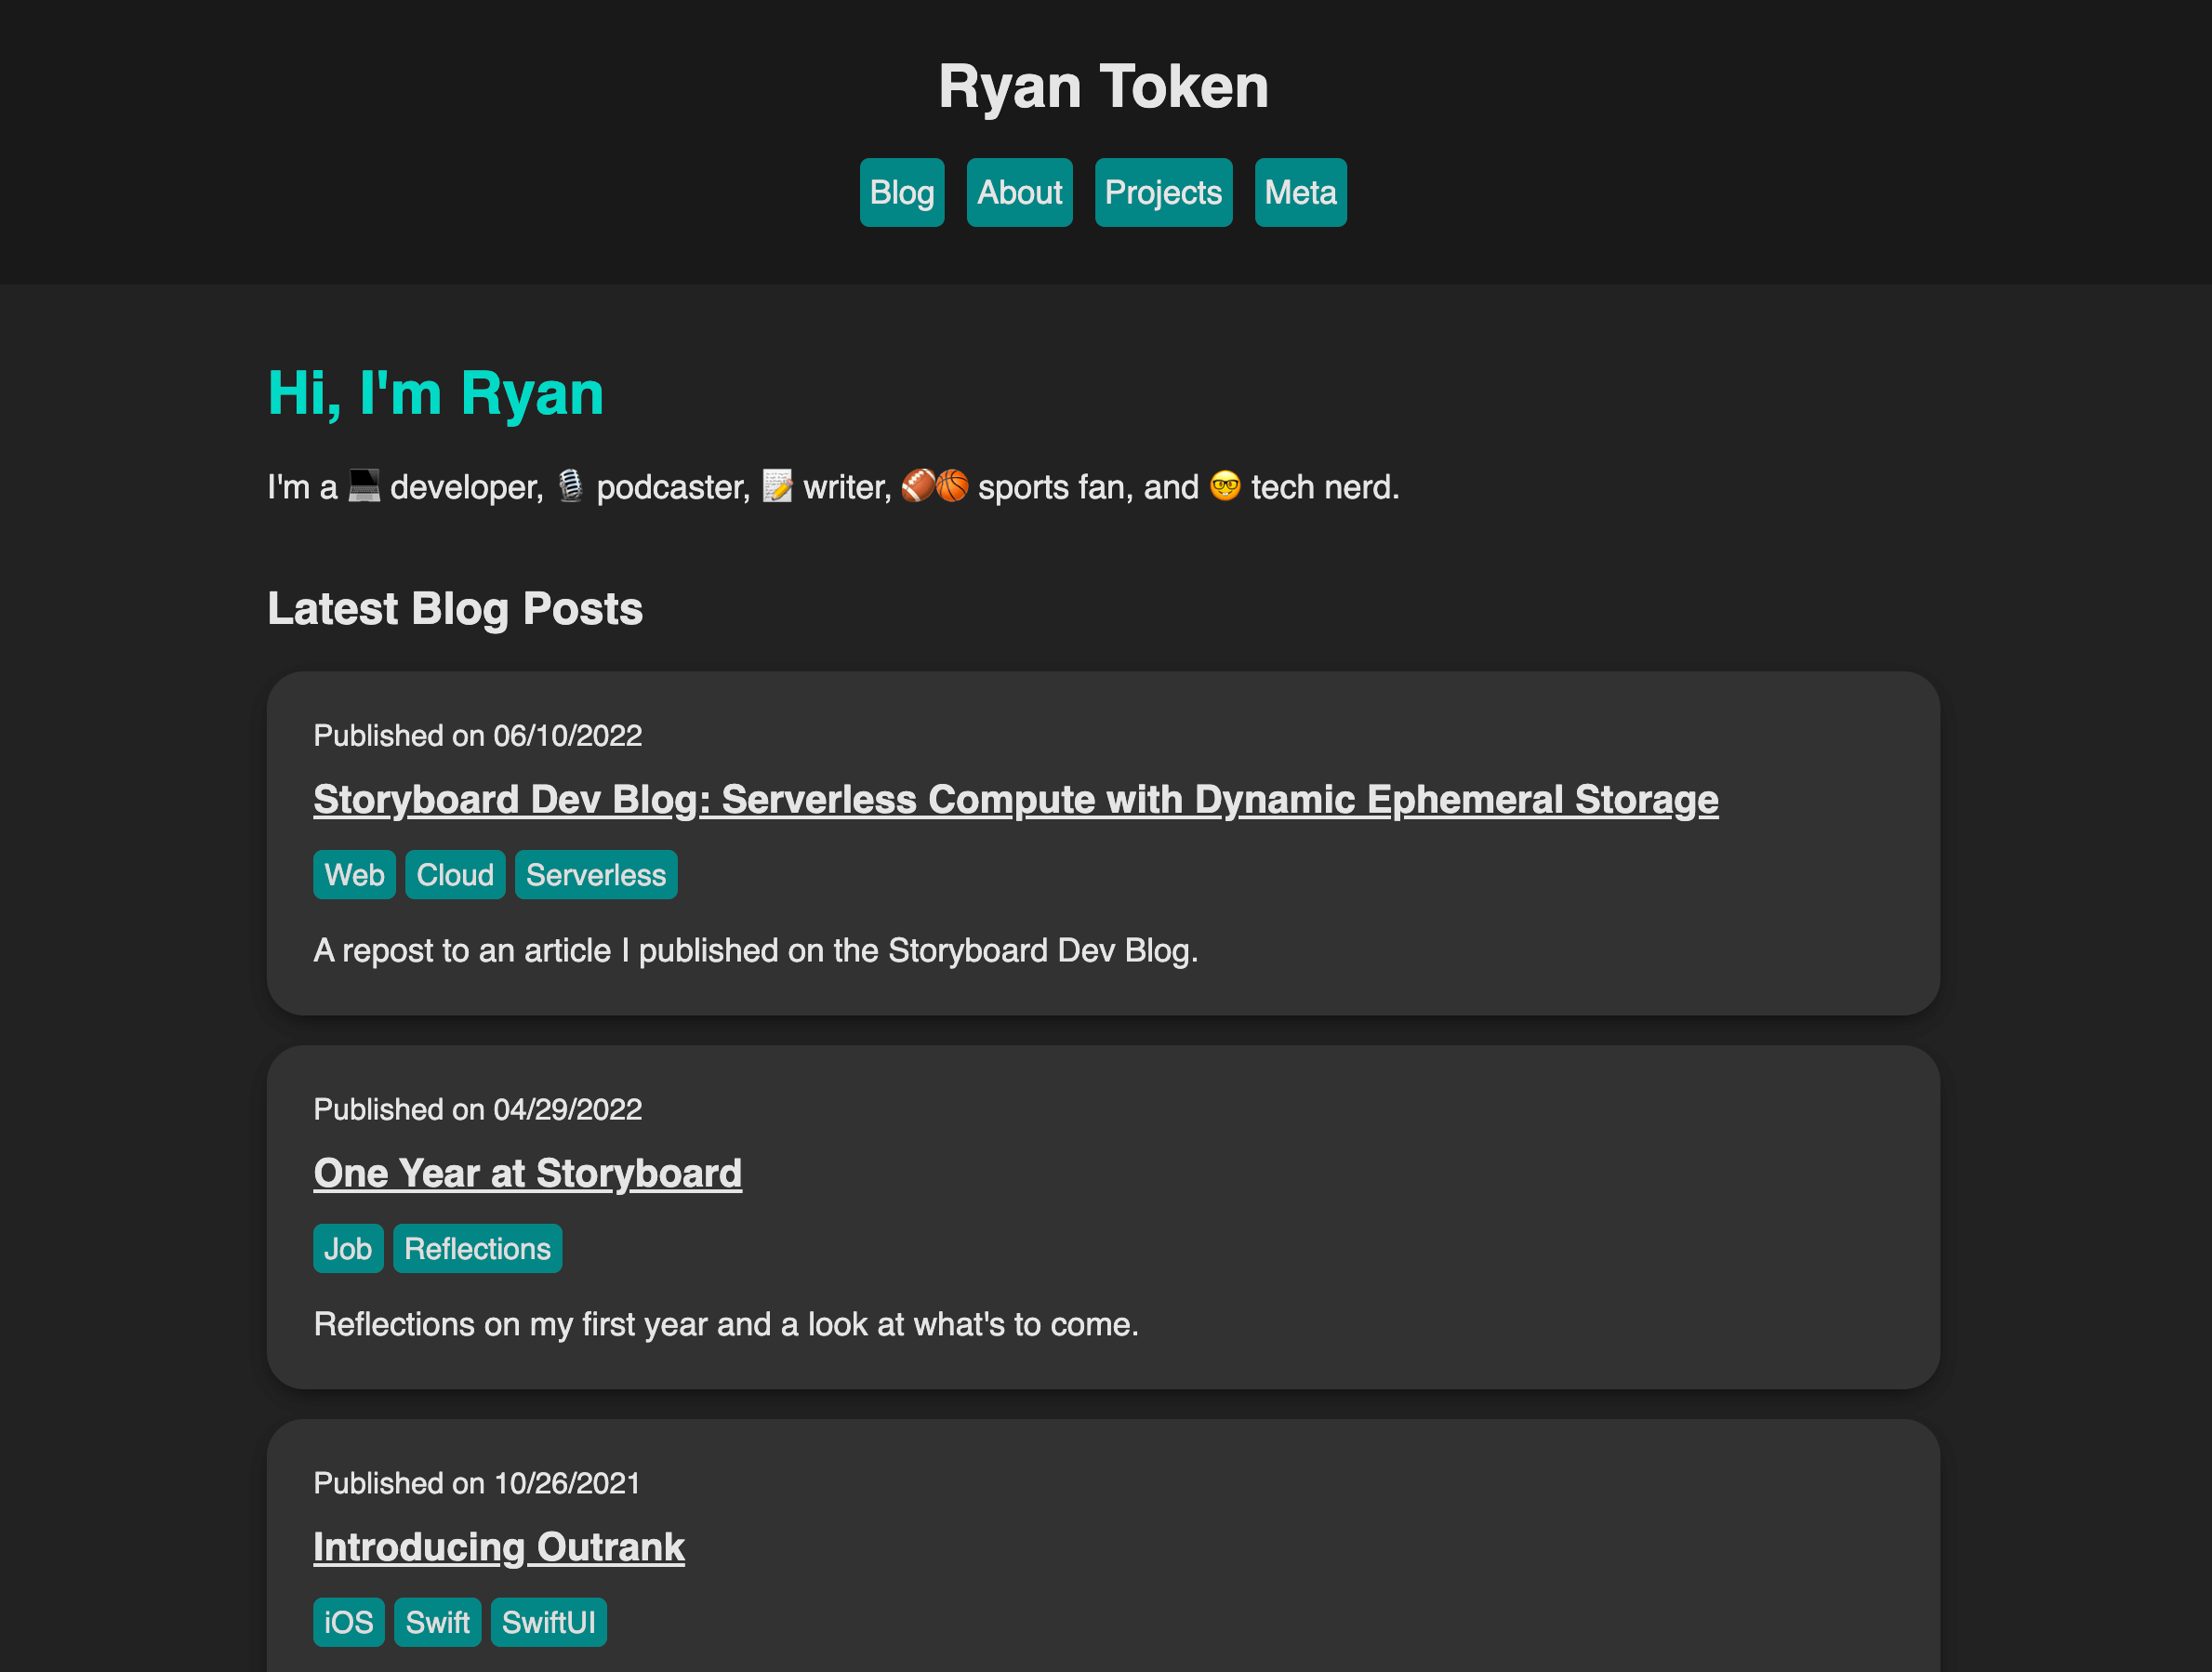
I built that version of the site with Swift and Publish - a static site generator for Swift. While a great tool, I needed something more flexible that better aligned with how I feel about web development today. Thus, the rewrite project began.
The Debate
The primary debate was about which framework I was going to use. After some thought, I landed on two options. Option one was Nuxt 3: a Vue framework we use at Storyboard. Option two was SvelteKit: a new framework I originally heard about due to Scott Tolinski frequently singing its praises on the Syntax podcast. I come from a React background, so regardless of my choice it was going to be quite new conceptually and syntactically.
Additionally, Nuxt 3 and SvelteKit are both meta-frameworks. Nuxt is a meta-framework for Vue, and SvelteKit is a meta-framework for Svelte. This means that they’re frameworks that provide abstractions on top of other frameworks - primarily to handle the boring/routine stuff for you. Think wiring up page routes, sharing common layouts between pages, handling smooth page transitions, etc. They also generally come with best practices built in like build optimizations, link prefetching, and more. I did have some experience with meta-frameworks like Gatsby, but not much. And while most of this post will compare the meta-frameworks of Nuxt 3 and SvelteKit, we’ll also get into some of the differences between the core Vue and Svelte frameworks.
Let me preface the rest of this post by emphasizing that I am not a front-end expert. My full-time job is primarily in serverless back-end development with node.js. On top of that, most of the front-end framework experience I do have is in React. I’ve played around with Vue before but was completely new to Nuxt, Svelte, and SvelteKit. Because of this, I’m certain I will get some front-end terminology or facts wrong. Please email me with corrections or clarifications if you have them.
Ok, on to the main event.
Both Nuxt 3 and SvelteKit offer some similar features out of the box, including:
- Filesystem-based routing
- Route prerendering
- Link prefetching
- Fully static and server-side rendering options
- Single-file components
- Easy integration with Tailwind, which I knew I wanted to try for this rewrite
I first decided to do the rewrite with Nuxt 3. As mentioned, we use Vue and Nuxt at my place of work and I wanted to get my hands dirty with how it actually works. Again, I currently spend most of my time doing back-end development.
However, Nuxt 3 has now been in Release Candidate mode since April of 2022 (about 6 months at time of writing). It still isn’t done and is missing some key features for me to be fully satisfied with it. After waiting long enough for Nuxt 3 to be fully released, I decided I would also rewrite my website with Svelte and SvelteKit.
Both of these rewrites have been more-or-less completed and live at different URLs.
Before spoiling which one I chose, let’s get into my experience with each:
Nuxt 3
Nuxt 3 is a brand-new framework. It doesn’t have a 1.0 release yet and I’m still waiting on several key features to be released. Primarily Nuxt Image support for static sites or sites hosted on Netlify or Vercel, and Nuxt Content support for static sites.
Neither of those issues are complete dealbreakers though. I can 1) not use Nuxt Image, and 2) go with server-side rendering for now instead of a fully static site. That works around both of those issues for the time being.
Developer Experience
Despite those hurdles, I’ve sincerely enjoyed the developer experience of building with Nuxt 3 and Vue 3.
Things like this from Nuxt 2:
<script>
export default {
  data() {
    return {
      count: 0
    }
  },
  methods: {
    increment(){
      this.count++
    }
  }
}
</script>
Turn into this with Nuxt 3:
<script setup>
  const count = ref(0)
  const increment = () => count.value++
</script>
So much nicer. Additionally, one of the primary reasons I wanted to use Nuxt 3 was to take advantage of the Nuxt Content rewrite - which is their content engine and what I use to generate the blog.
My website is not a complicated one. It’s primarily just a bunch of static pages that include text and images. The only relatively complex parts are the responsive sidebar and the blog. The sidebar could be solved once and considered “done” - it’s not something I should need to revisit often.
The blog, though, needs to be as simple as possible to maintain and update over time. If blog posts are hard to write, or, once written, hard to connect to the rest of the site, that puts up a large mental roadblock for me to continue writing.
The Blog - Nuxt and Nuxt Content
Nuxt 3 and Nuxt Content solve the blog problem. All you need to do is create a /content directory at the root of the project, a /blog directory within that, and a new folder for each blog post. You can then write blog posts in standard markdown and include Vue components within that markdown via MDC syntax. Nuxt will automatically configure the routing for you. For example, an index.md markdown file within /content/blog/fancy-blog-post will be accessible at https://your-website.com/blog/fancy-blog-post. Pretty sweet!
MDC Syntax
I did find the MDC syntax a bit annoying, though. Again, this is the syntax used to include Vue components in the markdown itself. For instance, I have a custom Vue component for showing a responsive/resizable image. To include that in a blog post with Nuxt Content and MDC, it looks like this:
::ResizableBlogImage{src="/path/to-image.png" altText="Some alt text"}
::
The double-colon syntax felt weird to me. Maybe that’s common in parts of Vue that I’m not familiar with, but it’s much different from how you use components in standard Vue files.
The previous example was for a “block” component, something that isn’t inlined with the rest of the markdown. You can also use Vue components inline via MDC, but I ran into another oddity there. If I wanted punctuation immediately after the inline component, it broke! The MDC syntax itself would render in the blog post instead of the actual component.
The only way I found to get around this was to include the punctuation within the component’s props, like so:
:ExternalBlogLink{url="https://url-to-go-to.com" text="The text to style with a period at the end."}
This component in particular styled the URL a certain way though, so it would also style the ending period that way. Not ideal. That’s how it works in the Nuxt version of the site today. If this issue has since been fixed, please let me know!
Edit: @manutopik informed me on Twitter that “standard” component syntax works as well! So this is also appropriate MDC syntax:
<ResizableBlogImage src="/path/to-image.png" altText="Some alt text"></ResizableBlogImage>
Additionally, Sébastien Chopin, the author of Nuxt, let me know on Twitter that the inline component issue with punctuation should be fixed very soon.
Other - Nuxt
That covers the key components of what differentiated Nuxt for me. The developer experience was largely wonderful, and Nuxt Content gave me an easy way to hook up blog posts to the rest of the site.
There were several other benefits of Nuxt that I found useful while doing the rewrite as well. I’ll list a few of them here:
- Vue 3 and the Composition API were fantastic to work with. Composition utilities like useFetch saved me considerable time and removed plenty of unnecessary boilerplate.
- The extremely fast development feedback loop powered by Vite and Nitro.
- Just using Vue in general compared to my previous experiences with React. Vue felt easier to pick up and lighter weight than React, while giving me more than enough functionality for what my website needs.
Svelte and SvelteKit
While Vue is conceptually similar to React in many ways, Svelte is largely not. Svelte does still have the concept of components, reactivity, lifecycle hooks, etc… like React & Vue do, but Svelte is very different in how it accomplishes some of those things.
For example, React and Vue both use what’s called the “virtual DOM” for updating the actual DOM whenever the application’s state changes. This is a bit of overhead to simplify the development experience for the user.
Svelte rejects the entire idea of the virtual DOM and extra state management libraries.
> Unlike traditional UI frameworks, Svelte is a compiler that knows at build time how things could change in your app, rather than waiting to do the work at run time.
In the end, this means that Svelte can achieve a similar declarative, state-driven UI development style without the overhead of the virtual DOM. That is the primary benefit here, and it results in some very fast (and concise) code.
Svelte itself is the compiler that handles the reactivity components at build time. You can learn the basics of Svelte through their excellent code-along tutorial.
SvelteKit is to Svelte as Nuxt is to Vue, or as Next.js is to React. A “meta-framework” as I mentioned earlier. It gives us filesystem-based routing, link prefetching, and plenty more.
Let’s look at some of the items we mentioned in the Nuxt 3 section and how they’re implemented in SvelteKit.
The Blog - SvelteKit and mdsvex
We can get automatic blog post routing with SvelteKit by just using their standard filesystem-based routing and a dynamic route. We can simply create a directory structure at /src/routes/blog and drop all of our markdown files inside the /blog folder.
This won’t work right away, though, because every route on a SvelteKit site needs a +page.svelte file. We want our markdown files to serve as this +page.svelte file though, and that’s where SvelteKit’s dynamic routes come into play. We create a [slug] folder (brackets included) within the /blog folder and we put both a +page.svelte file and a +page.js file in there. This allows us to use Svelte’s built-in load function within +page.js and dynamically load the data that a given blog post will need. We can then display it in +page.svelte.
I know that’s a lot of Svelte-specific info. If you want to get deeper into the weeds on how this works and how to set up a SvelteKit blog yourself, check out Josh Collinsworth’s SvelteKit tutorial. And tip him a few bucks while you’re at it for the fantastic content. I sure did.
Regardless, that gives us a dead-simple way to add posts to our blog. All I have to do going forward is create a new post-title.md markdown file within the /blog folder and I automatically get a new blog post live on the site. Perfect.
mdsvex
Svelte’s counterpart to Nuxt’s MDC syntax is called mdsvex. An odd name for sure, but it’s supposed to be the svelte-y naming equivalent of the popular MDX syntax for React. MD and X to represent dynamic markdown, plus SVE in the middle for Svelte, equals mdsvex 🤷♂️
Additionally, mdsvex is not an officially sanctioned, first-party “components-in-markdown” preprocessor like MDC is for Nuxt. It’s an open-source third-party library. Despite it not being a first-party piece of technology, I found it simpler and easier to use than MDC in Nuxt. You can see some side-by-side comparisons in the Comparing Nuxt 3 and SvelteKit section below.
Here’s how you use components in markdown with mdsvex:
<ResizableImage src="/path/to-image.png" altText="Some alt text" />
Look at that! So straightforward. You use it just like every other Svelte component in any other Svelte file.
And it’s the same for inline components. No weird asterisks around how to handle punctuation or special symbols immediately after you use the component. It just works.
Other - SvelteKit
I’ve already discussed most of the primary benefits I found when using Svelte and SvelteKit, as well as discussed how I implemented the blog in this version of the site. But several other SvelteKit niceties deserve a callout before moving on:
- Like Nuxt 3, the developer experience was great and the development feedback loop was extremely fast. SvelteKit also uses Vite but comes bundled with a Svelte plugin for Vite and Hot Module Replacement (HMR) to reflect changes to your code in the browser immediately.
- Svelte itself was surprisingly easy to learn. I mentioned the tutorial already, but it really is very simple to get a hang of while you work through that. It’s a clean and simple framework.
- Due to its smaller size, no virtual DOM, optimizing at build-time rather than run-time, and no need for extra state management code, Svelte is arguably the fastest JavaScript framework on the market today
Comparing Nuxt 3 and SvelteKit
Ok, enough on my experience with each. Let’s get into some hands-on comparisons between how they performed when actually building this website. I’ll start with a couple of component comparisons before getting into total page sizes, load speeds, and total lines of code.
Component Comparisons
Topbar Component
A good first component to look at for comparison’s sake is the Topbar component. The Topbar only appears on small screens/mobile phones, but it interacts with the Sidebar in an interesting way.
When you tap the sidebar icon, it needs to send some kind of notification to the Sidebar component to let it know that it should open/close itself.
Here’s what the Topbar looks like:

Here’s a simplified implementation of the Topbar component in Vue 3:
Topbar.vue
<script setup>
  import IconShowSidebar from '~icons/zondicons/show-sidebar'

  const emit = defineEmits(["toggleSidebar", "updateSelectedPageFromTopbar"])
  const toggleSidebar = () => emit("toggleSidebar", true)
  const updateSelectedPage = () => emit("updateSelectedPageFromTopbar", "index")
</script>

<Template>
  <div>
    <button
      @click='toggleSidebar'
      type="button"
      value="Open sidebar"
    >
      <icon-show-sidebar />
    </button>

    <NuxtLink to="/" @click="updateSelectedPage">Ryan Token</NuxtLink>
  </div>
</template>
And here it is in Svelte:
Topbar.svelte
<script>
  import { SidebarIcon } from 'svelte-feather-icons'
  export let open
  export let currentPage

  const toggleSidebar = () => open = true
  const updateSelectedPage = () => currentPage = 'index'
</script>

<div>
  <button
    on:click={toggleSidebar}
    type="button"
    value="Open sidebar"
  >
    <SidebarIcon />
  </button>

  <a href="/" on:click={updateSelectedPage}>Ryan Token</a>
</div>
The Topbar component and the Sidebar component are rendered at the same level in the component hierarchy - one is not a child of the other. However, the Sidebar needs to react to changes in the Topbar’s state. As mentioned, when a user taps the “toggle sidebar” icon in the Topbar, it should open/close the Sidebar.
For reference, here’s a simplified version of the parent component that renders both the Sidebar and the Topbar:
<script>
  import Sidebar from '$lib/components/Sidebar.svelte'
  import Topbar from '$lib/components/Topbar.svelte'
  export let data

  let sidebarOpened = false
  let currentPage = $page.url.pathname
</script>

<div>
  <Sidebar openedStatus={sidebarOpened} currentPage={currentPage} />
  <div>
    <Topbar sidebarOpen={sidebarOpened} currentPage={currentPage} />
    <main>
      <slot />
    </main>
  </div>
</div>
A change in the Topbar’s sidebarOpen state needs to be bubbled up to its parent component, then forwarded on to the Sidebar component so the Sidebar knows whether it should open itself, close itself, or do nothing.
Props are typically sent from a parent component to a child component. Sending prop data changes back up the hierarchy from a child to a parent is always more complicated. Vue and Svelte both have ways of handling this, but they do it very differently.
Vue uses the concept of emits to send messages from a child to its parent.
Svelte uses two-way data bindings instead. In the parent component, I can pass the value of the Topbar’s open prop to the Sidebar with the bind keyword like so: <Sidebar bind:open={sidebarOpened} />
Personally, I found Svelte’s approach to be more straightforward than needing to emit an event and then set up an event listener that reacts to that. Neither approach was overly complex, but Svelte’s felt more natural to me.
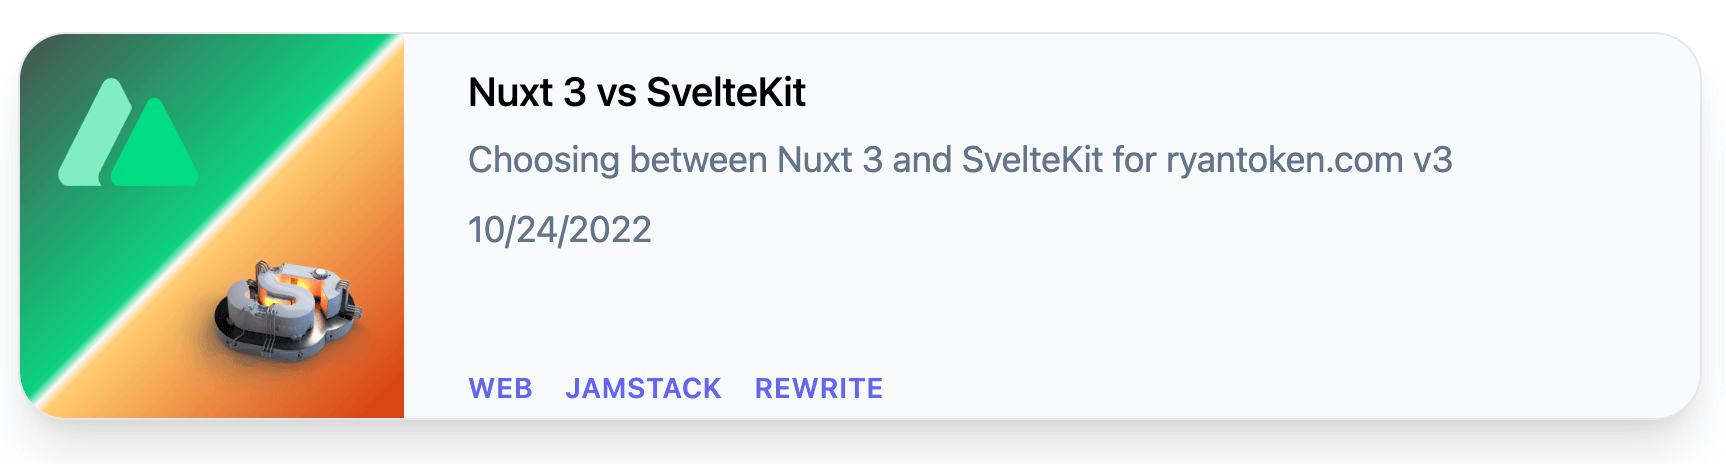
BlogPreview Component
Let’s look at one more component comparison before moving on.
The BlogPreview component is the responsive card that shows each blog post’s primary image, title, description, publish date, and tags. Here’s how it looks:
Here’s a simplified implementation of it in Vue 3:
<script setup>
  const props = defineProps({
    slug: String,
    title: String,
    description: String,
    date: String,
    image: String,
    imageAlt: String,
    tags: Array
  })

  function navigate(path){
    return navigateTo({
      path: path
    })
  }

  const formattedDate = computed(() => {
    const isoDate = props.date
    const dateString = new Date(isoDate.replace(/-/g, '\/').replace(/T.+/, ''))
    const conciseDate = dateString.toLocaleDateString()
    return conciseDate
  })
</script>

<template>
  <div>
    <div @click="navigate(slug)">
      <div>
        <div>
          <img :src="image" :alt="imageAlt" />
        </div>

        <div>
          <p>{{ title }}</p>
          <p>{{ description }}</p>
          <p>{{ formattedDate }}</p>
          <div>
            <div v-for="tag in tags" :key="tag">
              <NuxtLink :to="'/tags/' + tag" @click.stop="navigate(`/tags/${tag}`)">
                {{ tag }}
              </NuxtLink>
            </div>
          </div>
        </div>
      </div>
    </div>
  </div>
</template>
And here’s how it looks in Svelte:
<script>
  import { goto } from '$app/navigation'
  export let slug, title, description, date, image, imageAlt, tags

  const formattedDate = () => {
    const isoDate = date
    const dateString = new Date(isoDate.replace(/-/g, '\/').replace(/T.+/, ''))
    const conciseDate = dateString.toLocaleDateString()
    return conciseDate
  }
</script>

<div>
  <div on:click={() => goto(slug)}>
    <div>
      <div>
        <img src={image} alt={imageAlt} loading="lazy" decoding="async" />
      </div>

      <div>
        <p>{ title }</p>
        <p>{ description }</p>
        <p>{ formattedDate() }</p>
        <div>
          {#each tags as tag (tag)}
            <div>
              <a href="/blog/tags/{tag}">
                { tag }
              </a>
            </div>
          {/each}
        </div>
      </div>
    </div>
  </div>
</div>
The main difference to outline here is how each framework handles a for-each loop within the HTML. For this component, we want to loop through an array of tags. For each tag in the array, we need to render out the name of the tag and a link to it.
Vue 3 (what Nuxt uses) does this with the v-for directive.
Svelte uses an #each block around the div that should be repeated.
Both are relatively nice and concise. I don’t have a strong preference between the two here. However, the Svelte component is 13 lines shorter than its Vue counterpart.
MDC vs mdsvex
I mentioned my preference for Svelte’s mdsvex to Nuxt’s MDC syntax earlier, but I want to give a side-by-side comparison here so it’s easier to understand why. Again, these are the libraries that allow you to use Vue or Svelte components within Markdown.
Here’s how you use a block component, like a resizable image, with Vue and MDC:
::ResizableBlogImage{src="/path/to-image.png" altText="Some alt text"}
::
And here’s how you do the same thing with Svelte and mdsvex:
<ResizableImage src="/path/to-image.png" altText="Some alt text" />
Again, neither are bad, but one of them makes more sense and is more concise. And that, to me, is the Svelte solution.
Page Size Comparisons
So we’ve talked now for a while about conceptual differences, syntactic differences, and developer experience differences between the frameworks, but what about real-world speed and size comparisons?
Let’s start with size.
To gauge a page’s size, I’m using Chrome’s standard Developer Tools and the Network tab. Doing a hard refresh of the home page of my site, I see the following:
Nuxt 3 site:
- 45 requests
- 942 kB transferred
- 2.0 MB resources
SvelteKit site:
- 37 requests
- 627 kB transferred
- 1.6 MB resources
The SvelteKit site is smaller in every way despite being a nearly identical website. Plus one for SvelteKit.
Additionally, Svelte, as its name implies, is simply a small framework. This is primarily because there’s no virtual DOM or extra state management libraries that Svelte needs to deal with. This results in a framework that’s smaller in overall size and has less JavaScript bloat.
The size difference between the two pages also lends itself to our next point of comparison: speed.
Page Speed Comparisons
Speed is harder to measure reliably. While the Network tab was consistent and reliable for calculating page size, it showed a significant variance in page load speed on every refresh for both versions of the site.
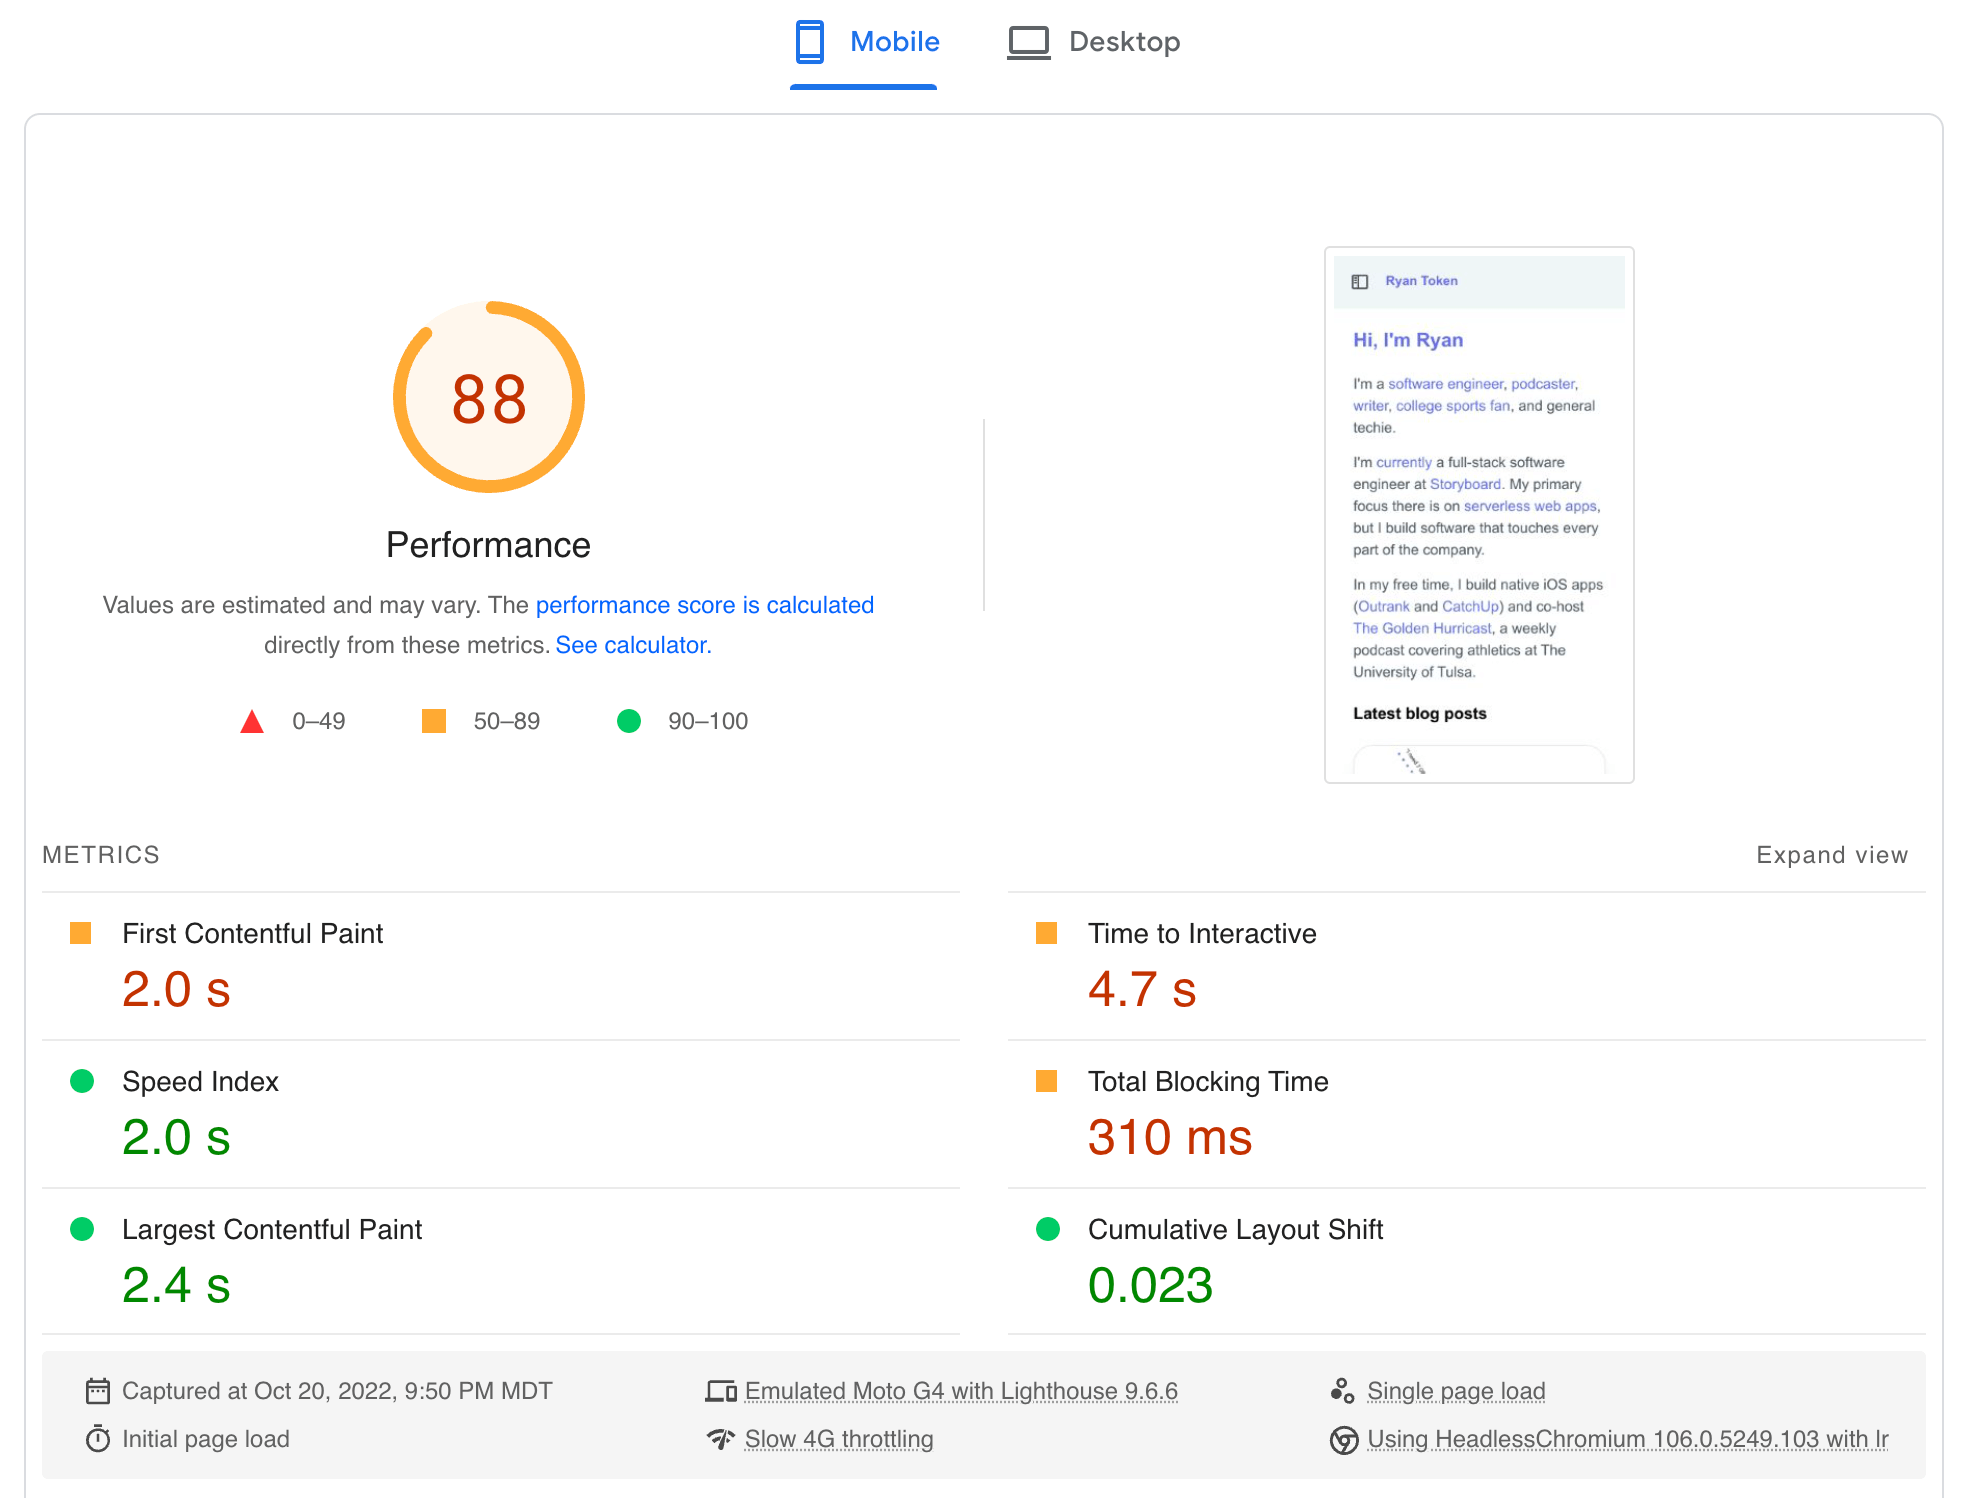
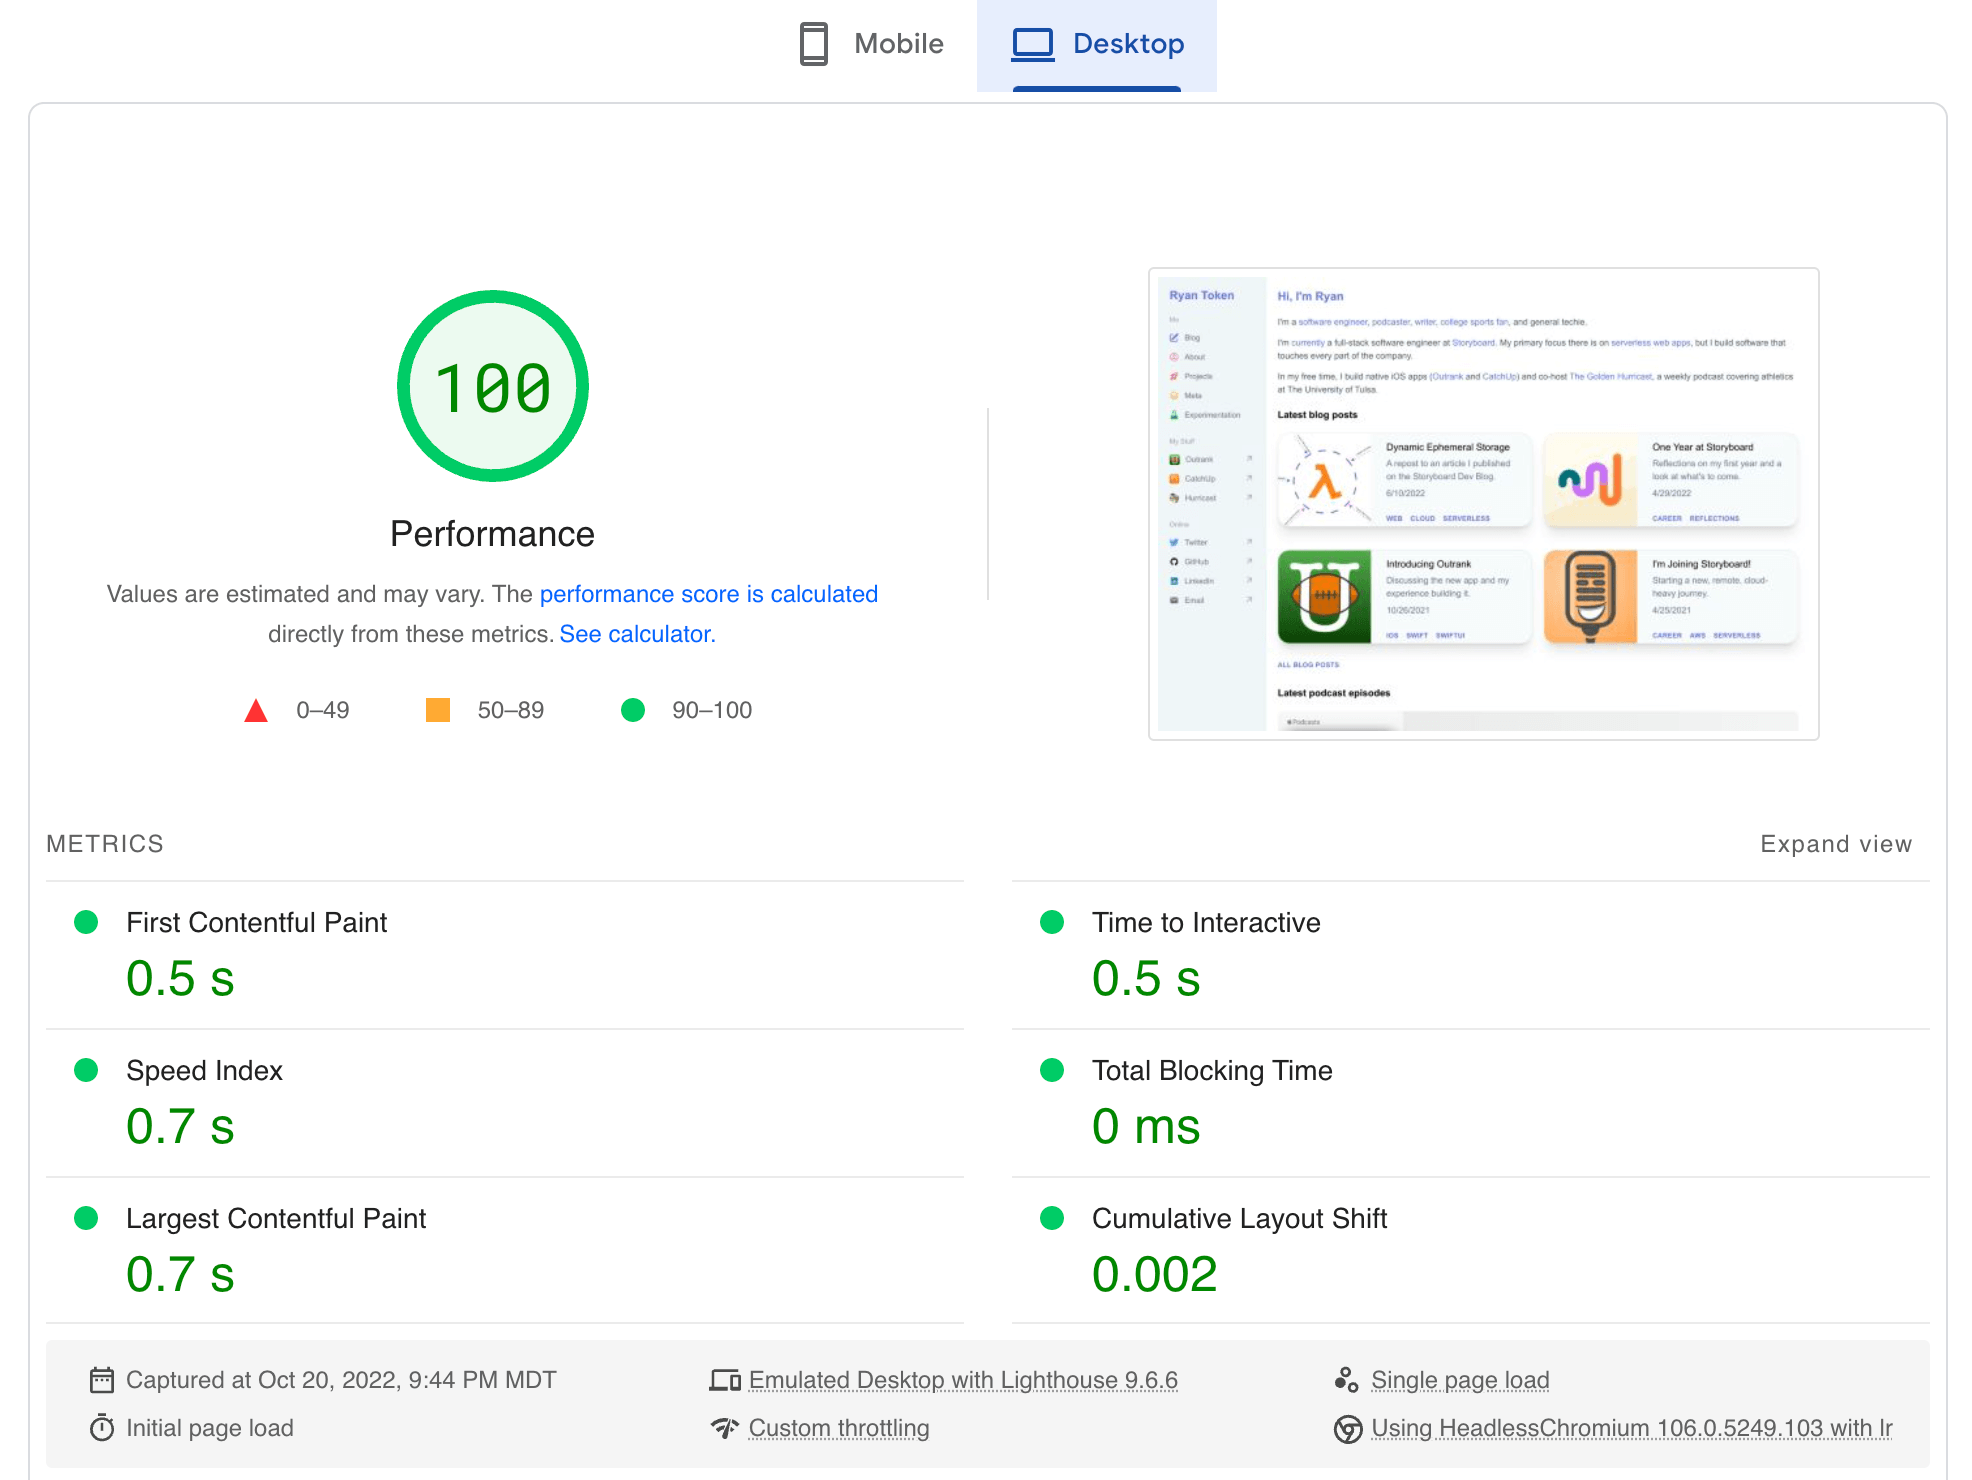
To try to put some more concrete numbers around this, we’ll defer to Google’s PageSpeed Insights.
Note: I have not yet put serious time into optimizing either site for increased performance metrics aside from compressing images.
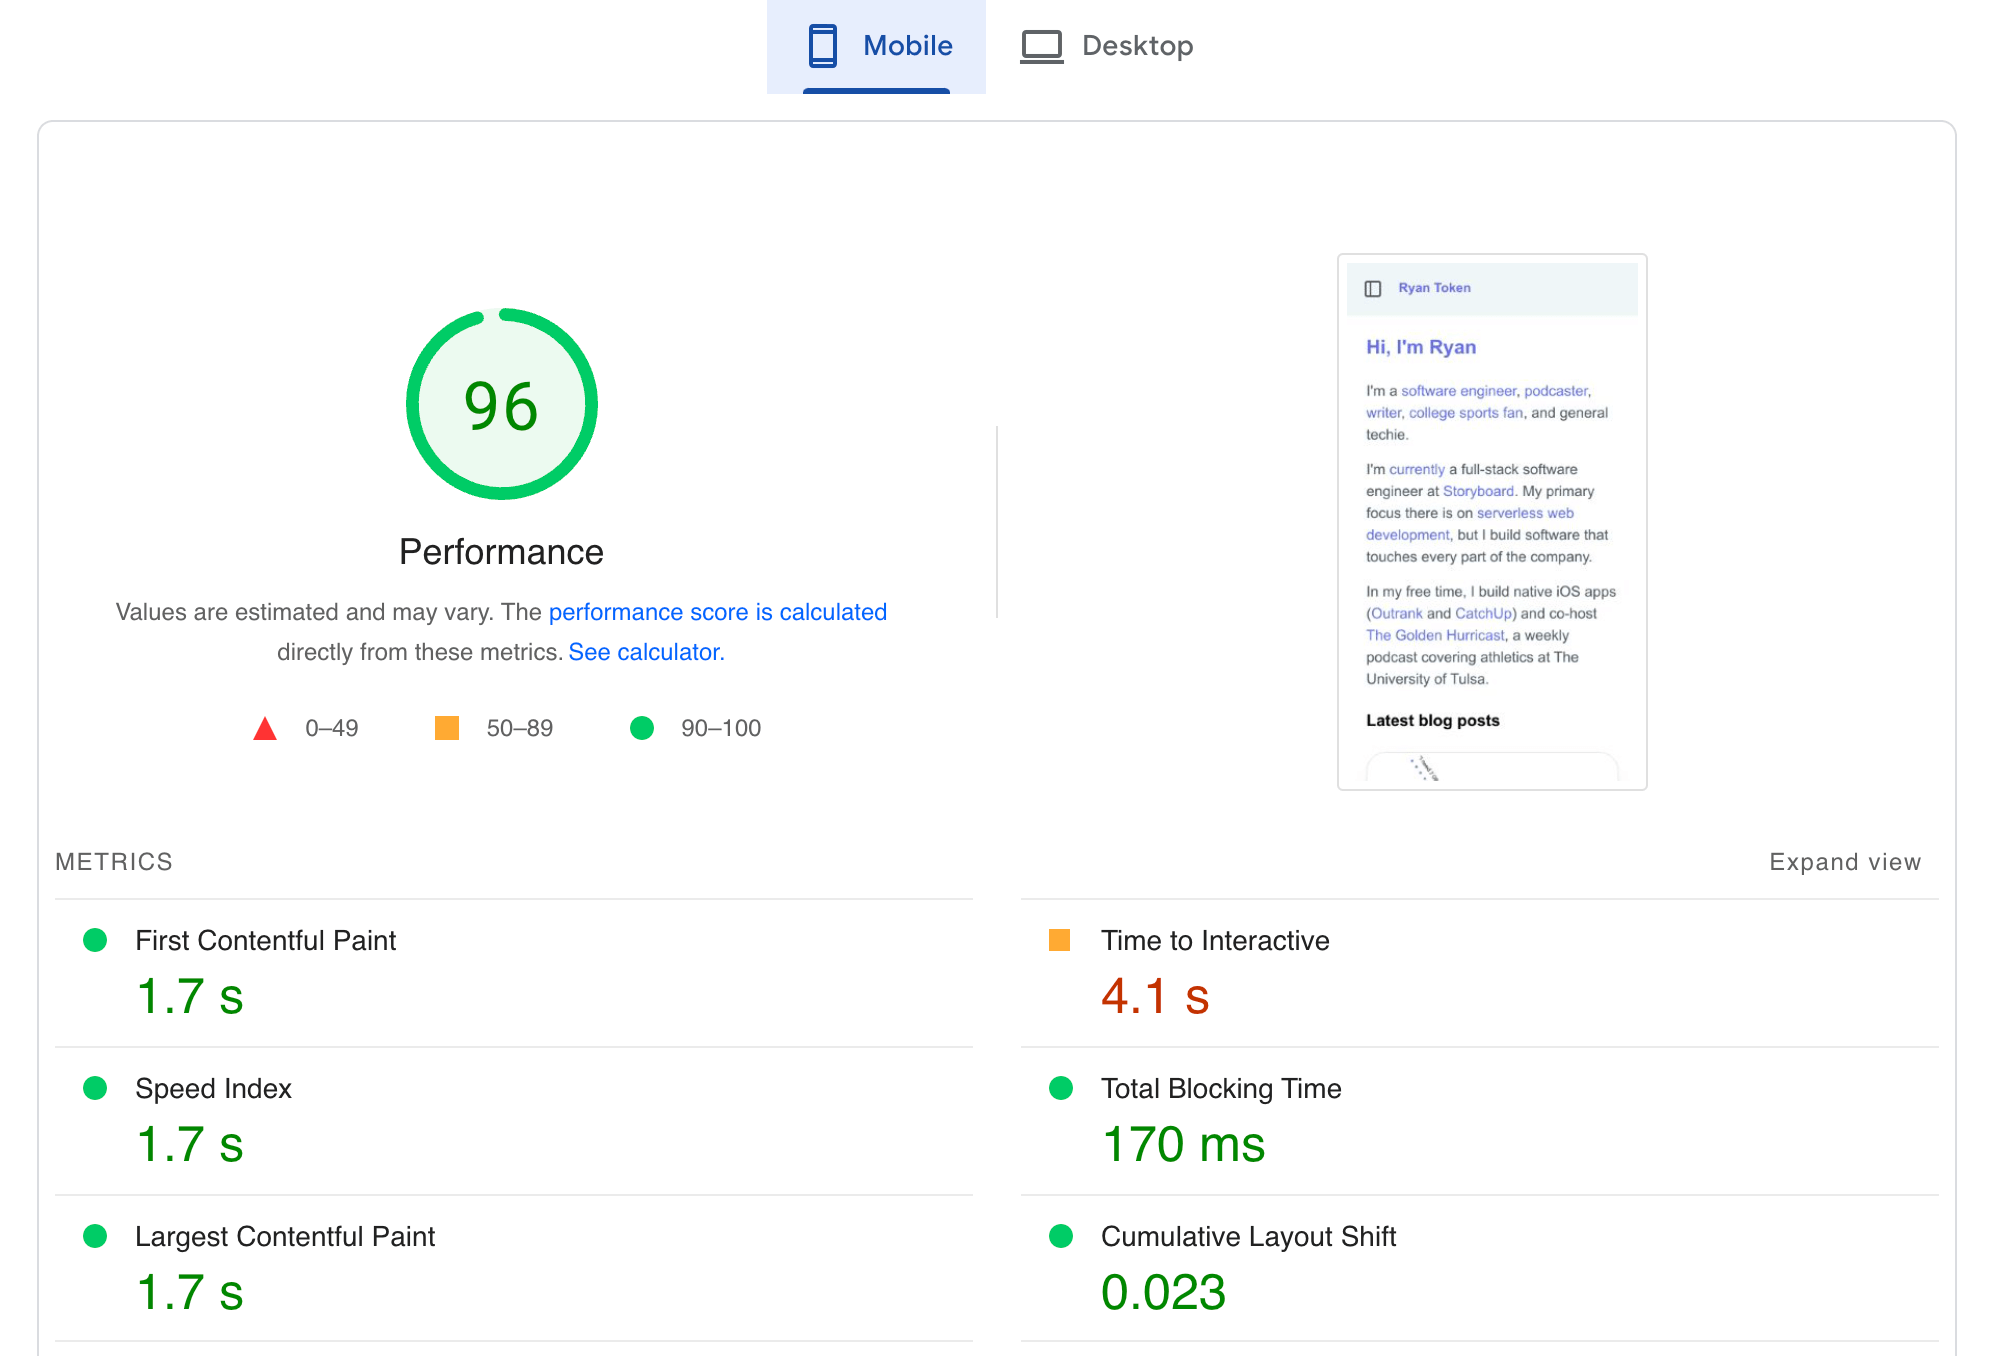
Nuxt 3 site - mobile
Nuxt 3 site - desktop
SvelteKit site - mobile
SvelteKit site - desktop
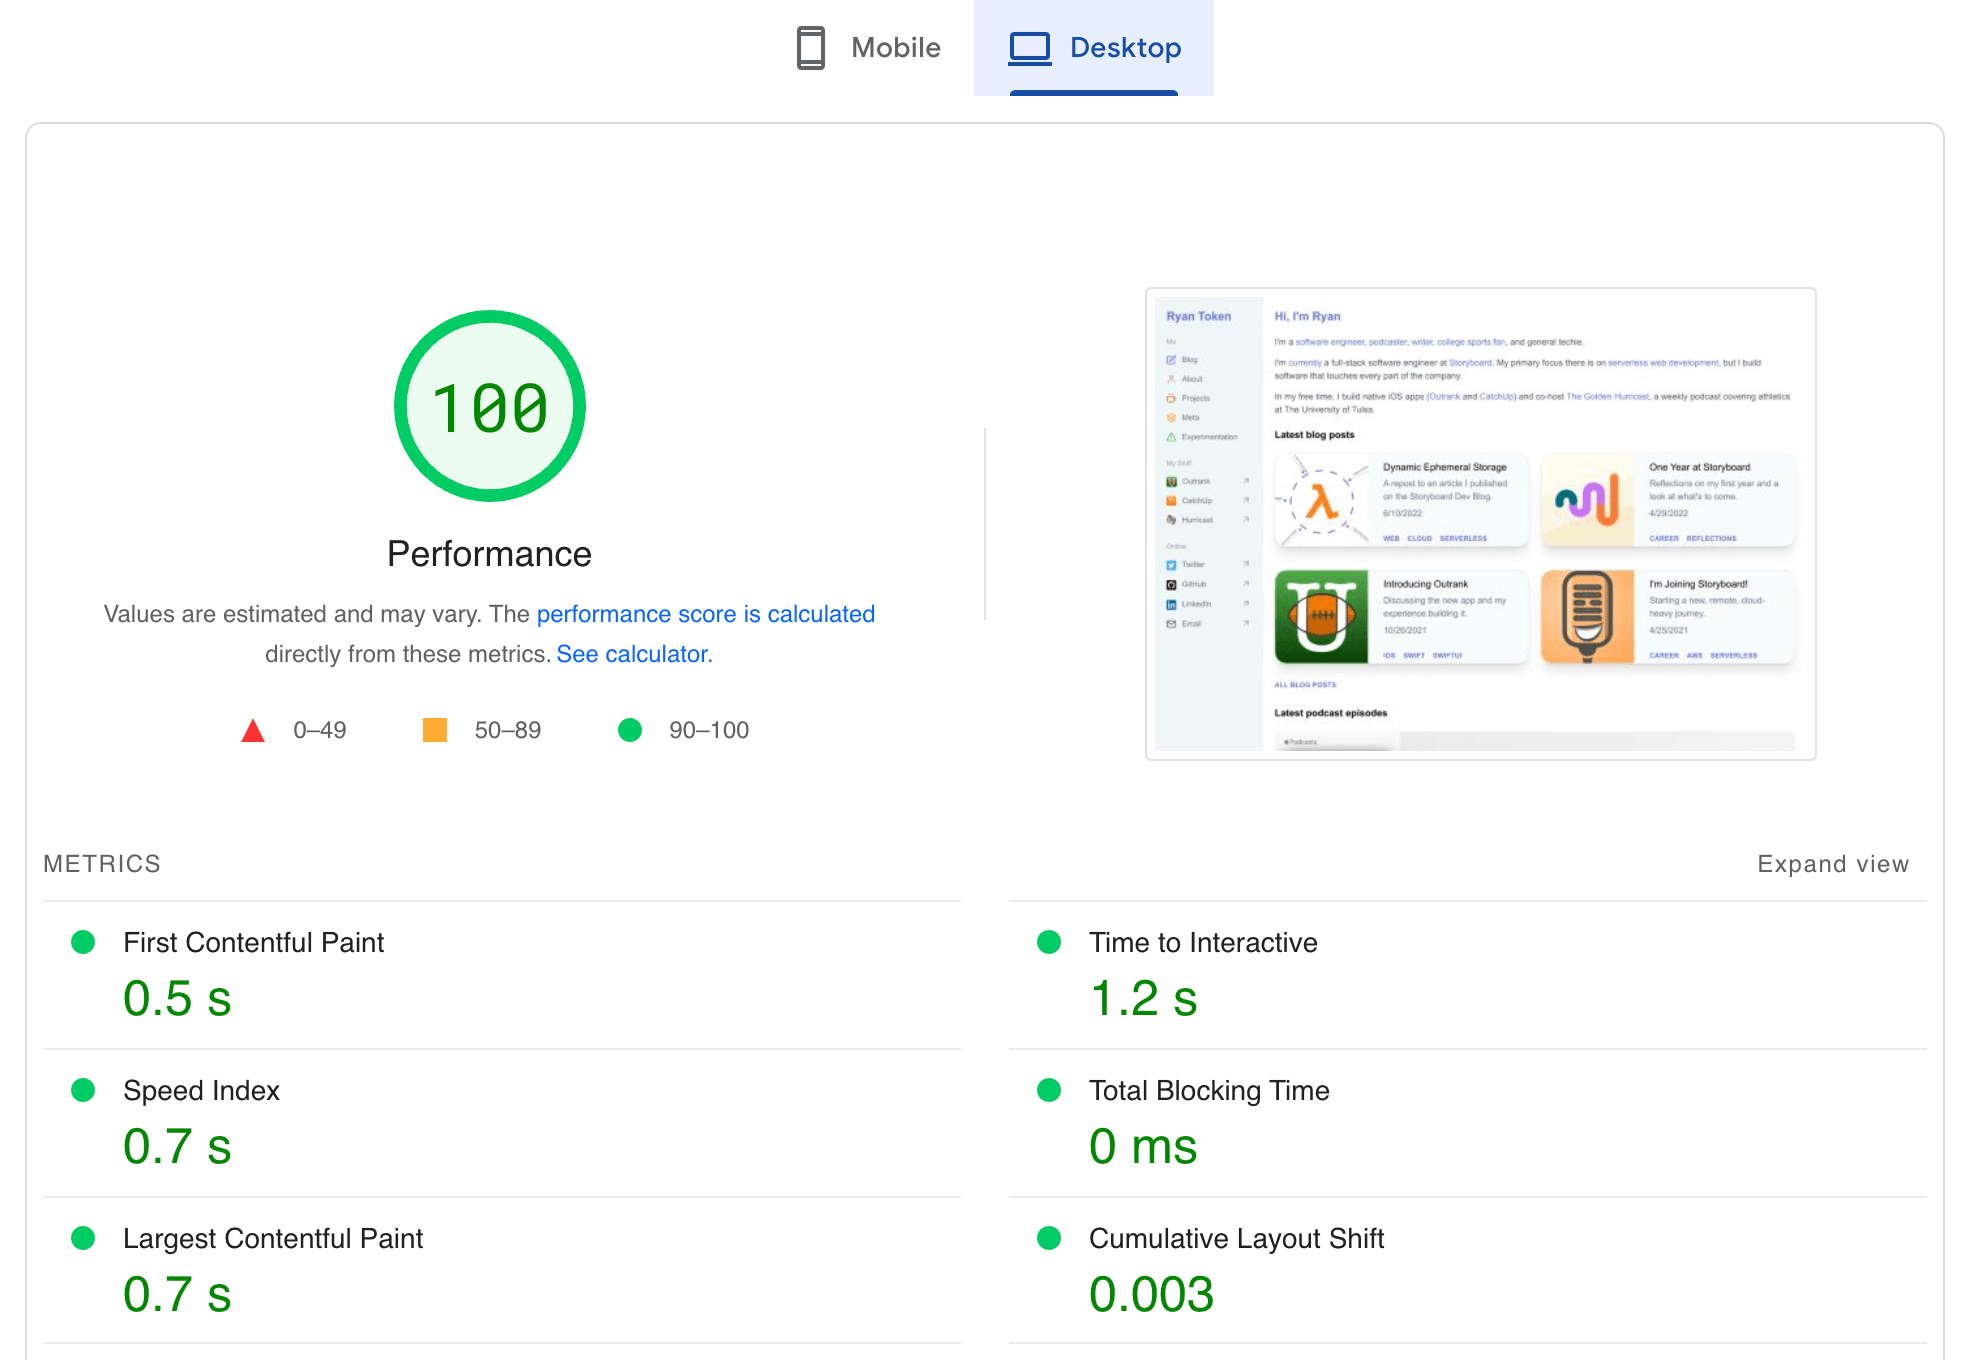
Some interesting takeaways there. First, they both scored perfect 100s on desktop. Again, I have put almost no time into deeper page optimizations. All I’ve actively done is compressed the image files throughout the site so they’re smaller and quicker to load. To get perfect 100s on desktop effectively out of the box with both of these frameworks is impressive.
There’s a bigger difference in how they scored for mobile. The Nuxt site performed moderately worse in every metric on mobile than the SvelteKit site. The primary performance drag for both sites was the Apple Podcasts embedded player I include on the home page. PageSpeed Insights complained about that player being slow to load every time. Given that it’s 1) lazily loaded, and 2) at the bottom of the page so you typically need to scroll to see it, I’m not too worried about it.
There were minor differences every time I ran the PageSpeed Insights process on each site. They were relatively consistent each time though, so I think it’s a fair comparison.
Total Lines of Code
Before we wrap up, I wanted to share a quick note on total lines of code for each project.
Total lines of code (counted with cloc):
- Nuxt 3 site: 27,939 total lines of code
-------------------------------------------------------------------------------
Language                     files          blank        comment           code
-------------------------------------------------------------------------------
JSON                             8              0              0          26092
Vuejs Component                 26            222             59            842
Markdown                        11            500              0            767
JavaScript                       3             17              0             75
YAML                             1              9              0             69
TypeScript                       3              9              3             61
CSS                              1              3              0             21
TOML                             1              2              0             10
Text                             1              0              0              2
-------------------------------------------------------------------------------
SUM:                            55            762             62          27939
-------------------------------------------------------------------------------
- SvelteKit site: 8,439 total lines of code
-------------------------------------------------------------------------------
Language                     files          blank        comment           code
-------------------------------------------------------------------------------
JSON                             4              0              0           6463
Svelte                          21            265              3           1001
Markdown                        10            452              0            656
JavaScript                      14             29              3            188
CSS                              2             21              8            119
HTML                             1              0              0             12
-------------------------------------------------------------------------------
SUM:                            52            767             14           8439
-------------------------------------------------------------------------------
A monstrous difference. 27,939 lines of code for the Nuxt 3 project, and only 8,439 for the SvelteKit project.
The major difference here is the amount of JSON. I’m not writing much JSON myself for this website - nearly all of that is coming from the package-lock.json file that manages dependency versions. This means that the Nuxt 3 version has a lot more internal dependencies than the SvelteKit version.
Doing an npm install from the root of each project reveals that the Nuxt 3 site is using 961 individual packages, while the SvelteKit site is using just 302. That is significant.
The amount of actual code you write as a developer is relatively similar for each, but SvelteKit having 1/3 of the overhead when compared to Nuxt 3 is very attractive.
The Winner (for now)

You’ve probably already guessed which framework I ended up choosing for the production version of the site.
I chose SvelteKit, and these were the primary reasons:
- It’s no-nonsense. The syntax is clean, concise, and consistent while using primarily traditional HTML, CSS, and JavaScript. There is some “magic” with SvelteKit, like the filesystem-based routing, but Svelte itself is very self-explanatory
- No virtual DOM diffing or complex state management code
- It’s reactive by default. Vue requires you to explicitly initialize reactive variables, Svelte does not
- It’s extremely fast and performs well on both desktop and mobile out of the box
- I prefer Svelte’s
mdsvexto Nuxt’sMDCfor components in Markdown. How the blog works is arguably the most important part of the site for me, so this matters a lot - I prefer Svelte’s two-way binding feature to Vue’s
emitfeature for bubbling props from child components up to their parents
Let me be clear, though. Nuxt 3 is an excellent framework. It’s performant, provides a wonderful developer experience, and has a great team behind it and a bright future ahead of it.
I loved building the website with Nuxt. I was consistently impressed with how intuitive its features were to implement and how quickly I was able to get off the ground. I began this project with Nuxt for a reason.
The current plan is to maintain both the Nuxt 3 site and the SvelteKit site over time. I may even change which one ryantoken.com points to at various times. Doing this will keep me up-to-date with how each framework is progressing and keep my skillset up on both simultaneously.
Nuxt 3 site: https://ryantoken-v3.vercel.app
SvelteKit site: https://ryantoken.com (you’re on it)
This was a wonderful exercise to go through, and I’ve never been happier with my personal website. Thanks for reading, and feel free to get in touch if you have feedback on this blog post or the site in general. I’d love to hear from you!
And if you particularly enjoyed this post, you can buy me a coffee!